It’s all fun and games until you start getting a little careless about your hair extensions and then one fine day you see your hair falling out!
I-tip hair extensions are a transformative option when you want to go from run-of-the-mill to royal. But in all of the glitter and glam of I-tip hair extensions, the risk of hair damage and loss is looming over your head. In this guide, we will show you how to apply and remove these kinds of human hair extensions and demystify the myth of ‘mane-taining’ your crowning glory.
Yes, it's scary to see a handful of hair fall out in the morning, but with Gemeria’s haircare recipes, we guarantee you that each lock, each strand and each head will have the perfect hair flip.
What Are I-Tip Hair Extensions?

First things first!
Trying out I-tip hair extensions for the first time?
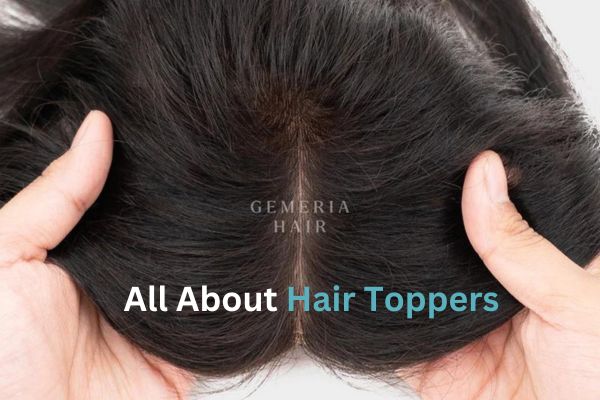
These are small bunches of hair that have a pointy tip. Each bundle of these strands are attached to your natural hair with a small grain or a bead of medical-grade adhesive. They are quite small and flexible which makes them convenient to glue or crimp the bead and the I-Tip securely to your hair.
These types of hair extensions are administered with a cold fusion method which is safe for natural hair. The application of this particular type of hair extension takes about three to four hours to apply.
These human hair extensions last anywhere between three to six months after application. Your hair will continue to grow out naturally and in a few weeks, the hair growth will grow along with the bead, moving it down further away from the scalp.
Types Of I-Tip Extensions Available On The USA Market

When it comes to finding the best hair extension online you have to pick them up from the best. Most hair extensions online can be deceiving. Some may promise you real human hair and deliver tacky, knotted synthetic stuff; others may send you hair extensions that don't match your hair colour.
See, this is the very reason you need to choose us!
Sourced straight from the temples of South India, we bring you 100%, natural, pure and treated human hair extensions. We have straight, naturally wavy to body-wave I-tip hair extensions.
We even have I-tip hair extensions for the curly girlies too!
Tight curly I-tips for those girls out there with an untamed beauty that whispers tales of spontaneity and individuality.
Oh, and for days you want some of that bad and boujee, opulent and glamorous vibes, we have the kinky curly I-tips for you. Trust us when we say this; if you style them correctly, with every twirl, and every curl, you’re sure to slay my girl!
DON’T EVEN GET US STARTED ON THE DEEP CURLY I-TIPS!
On home turf, our Indian beauty goddesses exude confidence, a harmonious blend of cultural pride and regal self-assurance.

Benefits Of Choosing I-Tip Extensions Over Other Methods
Here is a table to help you understand the benefits of this type of hair extension better:
| Benefits Of I-Tip Hair Extensions | Why They Are Better Than The Rest | |
|---|---|---|
| 1 |
No heat, just love. Say goodbye to heat damage and tension. |
Some extensions love the heat. Hair extensions like Hot Fusion need heat to seal the tips. |
| 2 |
No heat, just love. Say goodbye to heat damage and tension. |
You need the length. Most hair extensions work best on slightly longer hair. |
| 3 |
No more damage or itchy tensed scalps Say goodbye to heat damage and tension. |
The situation is tense here. Some hair extensions like clip-ins or sew-ins exert a little tension onto the scalp over time. |
| 4 |
They just keep on giving! Ideal for a long haul, they grow along with your hair. This means with one parlour visit you can reuse them. |
They don’t. Most hair extensions may require you to buy fresh extensions or detailed hair care regimes. |
| 5 |
Highlights all the way! These are perfect for highlighting different shades and giving your overall look a solid pop. |
Some extensions love the heat. Unlike I-tips, most hair extensions come with single or double wefts of a single colour. |
Prepare Your Hair First
Wash your hair a day prior, and make sure not to use any kind of product on your hair. Do not style your hair either. An important thing to remember before you go in for your appointment is. Try and avoid conditioning as this softens the hair and your stylist may find it difficult to fix your extensions correctly.
Talk to your stylist about desired hair extensions, considering length and thickness, spend time at your appointments, and follow your stylist's aftercare instructions to maintain the appearance and extend the extensions' life.
When planning for hair extensions, please consider the colour of your hair or if you have heat-treated hair. Remember, you need to match the extensions to your natural hair’s colour and texture for a seamless blend.
If you have heat-treated hair, consulting with your stylist is important. If you don’t, it may be prone to damage, affecting the extension's adhesion. Regular maintenance is necessary for these types of hair extensions. Always seek professional care from experienced stylists for proper application and care of extensions.
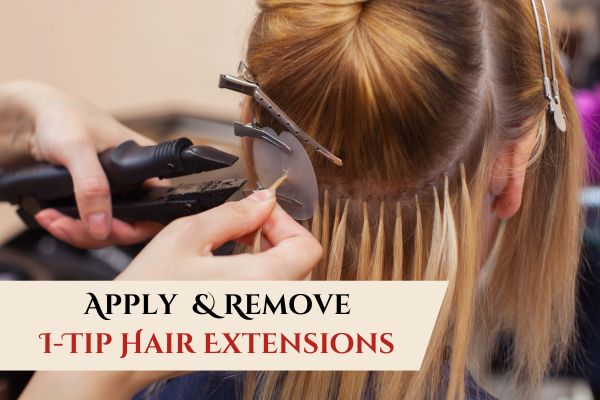
How To Apply I-Tip Hair Extensions
If you are attempting to apply I-Tip hair extensions on your own, at home, here are a few things you are definitely going to need:
- Microbeads or the tips preferably copper or silicon
- You will need a plier or a crimping machine specifically used for this procedure.
- Looping tool to get a grip on the strands of hair and loop them for fixing.
- Hair Extension Removal Solution this is optional.
- A fine-toothed comb
- Sectioning clips to section the hair
- A towel, cloth, and napkins.
- Detangling spray so that you don't rip the strands or your hair.
Steps on how to apply your I-tip hair extensions at home:
- You start by sectioning your hair and reserving a clear bit of space where you want to place the attachment. Ideally, the middle section of your head or the nape of your neck is the perfect spot for proper coverage, concealment and placement.
- This is where you thread each of the microbeads into the hook and pull the needle.
- Now that the bead is secure, you will take a bit of your natural hair and then loop it into the bead. This is where you want to place your i-tip hair extension.
- Next, move a microbead up the looping device, looping in the strands of hair. Drag the instrument downward when the microbead comes into contact with the hair. At the same time, press the microbead up to allow the hair to pass through. This places the microbead at the root of your hair strands. To achieve a flawless look and feel, avoid having the microbeads touch the scalp.
- This is where you place the I-tip between the bead and the natural hair and now you use the crimper or the plier to squeeze and seal the extension. Ensure that the extensions are naturally following the hairline sections for a super seamless look.
- Work your way upward the scalp in a horizontal direction and make sure you leave a two-finger gap between each row. Continue doing this until and unless you each have a horseshoe shape on the crown of your head.
- Remember, your hair will continue to grow and you will need to visit the parlour for a reattachment in a few weeks.
How To Remove I-Tip Hair Extensions
This is easy!
You will need the same types of equipment to take them off.
Here we go:
- You will start by sectioning your hair and finding the horizontal rows that you created with the microbeads. This kind of procedure helps you ensure a systematic and hassle-free removal procedure.
- To maintain a certain order you start from the bottom row and then work your way up. this way you won't tangle your hair and it simplifies the process.
- Using the players or the crimper apply a light force while removing your eye tape hair extensions. Exert gentle pressure on the ends of the bead and make sure you remove the bead without any accessive force.
- Be very careful and try not to apply excessive pressure or force while using these players or crimpers. if you do it only titles the beads and makes the whole removal process even more challenging.
- Continue doing this for every i-Tip of hair extension until all the beads have been carefully detached. follow these steps and you will have a smooth and painless removal experience leaving all your natural hair. This ensures a smooth and seamless removal experience, leaving your natural hair unharmed.
With the straight forward and painless procedure, and systematic and organised sectioning of your hair you are guarantee to have a quick and efficient process and saving your hair from any kind of unnecessary stress.
How To Take Care Of I-Tip Hair Extensions After Removing?
With the right kind of TLC, your Gemeria I-Tip hair extensions can last good for months. Here are a few hair care tips that you must follow to keep your hair looking beautiful bouncy and healthy.
- Go ahead and brush your hair extensions. This will stop it from tangling. But be sure not to home right from the route as this will cling on to the bead and rip it off.
- Always consult with your hair stylist on using a particular and professional shampoo as well as conditional that is sulphate and paraben free. Avoid any kind of natural products like on the hair as this contains a lot of protein and it can hinder the hair extensions maintenance.
- Always apply your conditioner only at the ends and the middle section of your hair extensions and never on the root area.
- Whenever you apply your conditioner make sure you leave it end for 3 to 5 minutes and gently comb it through to detangle and then finally rinse your hair.
- You must visit your hairstyle list at least once in 2 weeks or three weeks, this is highly recommended.
- one thing that you have to remember when it comes to I tip hair extensions is that you need to dry your hair out immediately after washing. this is because the bond swell up once they are wet and if they are regularly left them and moist it will soft and then eventually crumble. So never go to bed with wet hair.
- Always remember to brush your hair to before washing so that you do not tangle your hair. after you wash your hair try and apply a leave in conditioner and the heat protector before you go and blow dry or use any sort of heat styling tools to your extensions.
- At bed time remember to keep your extensions in a loose side braid to avoid any kind of tension to the extensions.
- Remember to always keep your hair clean and free from any sort of scalp, oils, dirt, sweat or products. This can contaminate the bonds and will cause them to soften even worse it can also lead to fungal infections and irritations.
- Last, never blow dry your hair upside down. Always blow dry your hair on low or medium heat. Please do not ever try to maintain or adjust these extensions on your own at home.
Conclusion
On the contrary your hair extensions must last at least 1 to 2 months depending on your hair growth. Remember, you can actually reuse your I-Tip hair extensions. These give you a seamlessly natural look and will elevate your overall style.
Head over to Gemeria now and pick your favourite hair extensions right away.